
this happened a little while back but since the website is only going online now, I’ll just post this now.
The exact inner workings of the currently in development SmartMelter are still secret so I won’t go into detail but there are a few parts that – out of context – don’t tell too much about it while still giving you a hopefully interesting little insight into the development.
Today that insight will be a very basic physics experiment… actually something that shows useful applications for simple but not too simple mathematics… actually: While it was useful here, I would generally recommend this experiment to anyone teaching science, just use a different powder, aluminum powder can be surprisingly dangerous if you don’t know exactly what you’re doing, so use steel powder if you’re a science teacher demonstrating this to 6th graders 😛
Anyways the SmartMelter will first be developed for aluminum powder and then adjusted for different materials.
So to recap very basic physics: The thermal conductivity of a material is the value to how well that material conducts heat through itself. It is usually given in W/k*m or watts per kelvin*meter (not to be confused with kilometer) – if you want to understand what that really means, the full form would be watt*meter/kelvin*m² but one meter on each side cancels out. This already makes more sense, since the cross section will affect positively how well an object conducts heat while the length the heat gets conducted through affects it negatively and that is basically already how you use this – you have a temperature difference in kelvin – a depth in meters – a cross section in m² – you plug these into the thermal conductivity of the material and you get the amount of thermal energy getting transferred in watt. Of course unless the object in question is a cuboid you will need integration, same goes for more complicated scenarios with several heatsources and of course you can convert that whole equation around to plug in thermal energy and get the temperature as a result.
Now to the part that really interests us. When developing a 3D-printer from scratch that works by melting metal powder it is of course essential to know how well that metal powder conducts heat. This is surprisingly complicated though since conductivity isn’t just a b-volume value – it goes by varying cross sections and heatpaths – imagine electric conductivity but for a billion tiny resistors all tied together in some chaotic mess of serial and parallel resistors. Luckily we can use a mathematical model to calculate this – for one constant shape of grains and assuming that tiny grains of powder behave very predictable – an optimstic assumption but it gives a rough estimate. Also here is actual research – complete with well documented published papers on nothing else but the thermal conductivity of metal powders depending on the surrounding medium (like air or argon), pressure, temperature… but always for perfectly spherical grains of powder. This makes perfect sense since the aerospace grade aluminum powder normally used in SLM machines actually comes in perfectly spherical grains – or at least a very good approximation of that. It turns out that due to the integral of the inverse of spherical cross sections the thermal conductivity of such aluminum powder is actually only about two to three times that of air since aluminum is a great conductor but all the heat still has to pass through air at some point – essentially a serial resistor with one resistor being very weak. For reference air has a thermal conductivity of about 0.025W/k*m whereas aluminum is up at about 200W/k*m (rough back of my head numbers as I write this article).
Now that would be a great result – you want some thermal conductivity so the parts you melt cool off again and solidify but too much thermal conductivity and you’re just melting one big block of aluminum rather then the shape you want to print.
Now we still have the problem that we are currently using everyday aluminum powder not aerospace grade aluminum powder. That is not perfectly spherical at all, in fact it’s a bunch of chaotically shaped flat grains comparable to graphite. Simulating in detail how this behaves would take a ton of computing power but we have a much easier way. We can take some of our aluminum powder, put it into a small plastic bin, put that plastic bin on a warm plate (WARM plate, NOT hot plate, safety first – it turns out the buildplate of a normal 3D-printer does the job well) – and use a thermal camera to see how heat spreads through the aluminum powder – or rather through the outside of the plastic bin – ideally that little plastic bin has very thin walls so they don’T add to the conduction and basically just take up the temperature of the powder inside – measuring the temperature of shiny metal surfaces with a thermal camera is tricky so this is much more precise.
We can use basic integration to see how long it should take for the heat to reach the top of the tiny plastic bin if the powder has our desired thermal conductivity – we will also need the thermal capacity of aluminum powder for that but fortunately, unlike conductivity capacity is a voluminous value that simply adds up – so if your aluminum powder is half as dense as solid aluminum you can simply average the capacity of air and aluminum, simple as that.
We will first estimate the time it takes:
We assume 0.025W/k*m for thermal conductivity and 450kJ/k*liter – for our 3 centimeter high plastic lid that means it should take about 30 minutes for the top of the powder to approach the bottom temperature by 30% – under the purely hypothetical assumption that our aluminum powder has the same thermal conductivity as air which would be impossible.
I did the experiment and it turned out it takes 8 minutes – this means that our aluminum powder has about 3.5 times the thermal conductivity of air – at least for a first estimate.
That is well within the margin we can design program and adjust around and with that knowledge we can later program our control algorithms.
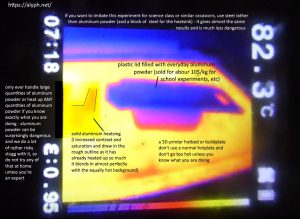
I attached a picture of the plastic bin of aluminum powder and a solid aluminum heatsink for comparison, seen through a thermal camera, standing on a warm buildplate – both were put on there at the same time, then being room temperature – the heatsink obviously took the heat all the way up much faster then the powder.
By the way, a similar method can be used to later check parts for structural integrity – if heat spreads slower then expected or in an unusual way that could imply that there is some crack or manufacturing problem in the material.
I hope this little insight was to some degree interesting – again, this won’t be an absolutely regular thing since I’ll have to find the time to do so between the actual development and because most of it is still secret, but I hope I’ll be able to give you a few interesting insights now and then.